

Installing FastPanel on a NAT server
1. To install FASTPANEL, we will need:
Operating system - Debian, Ubuntu, CentOS


Open ports - 3306, 8888, 7777


FASTPANEL license
1.1. The first thing we will start with is preparing the system, before installing the panel we will need to update all the system packages, as well as the system itself. To do this , we prescribe the koiand as follows:
Debian/Ubuntu


apt-get update && apt-get upgrade


CentOS


yum update && yum upgrade
2. After updating the system, as well as its packages, we can start installing FastPanel, to install it, we will need to run the installer with the command:
wget http://repo.fastpanel.direct/install_fastpanel.sh -O - | bash -
2.1. After you have entered this command and pressed the - Enter key, we are waiting for the installation. After successful installation of FASTPANEL, information with access data will be displayed in the terminal, but you must enter by the IP that was issued when ordering the server. See the output example below
Congratulations! FASTPANEL successfully installed and available now for you at https://192.168.1.8:8888/ .

Login: fastuser

Password: lNd+eg3wyLsI2+0n
3. Next you will need to open the ports listed above. To do this, go to the Billing panel and go to the "Cabinet -> Support -> Add ticket" tab, then specify the subject of the ticket "Opening/Port forwarding", and in the message itself you specify the ports you need, in our case it is 3306 - the Database port, 8888 - the port for connecting to the panel, 7777 - the port for websites. After we have received the ports we need, we can proceed to the next step.
4. "Obtaining a panel license". To get it, we need to follow the link ->
https://cp.fastpanel.direct/. Then we go through registration and click "Order a new license", after which you need to "Add the license to the cart and fill in the IP address field" and click "Proceed to payment", after that the license will be automatically created." The license is free.See picture below

5. The last point of setting up FASTPANEL on the NAT server. To do this, you need to activate the license by key, but to do this, you should - go to Personal account.
Select a license that points to the public IP address of this serverSee. pictures below

5.1 Copy the activation keySee. pictures below

5.2 Add the activation key to the license activation form of your control panel. After that, you need to configure the "Address Matching". See pictures below
5.2.1 Go to the Side Menu → "IP Management" → "IP Mapping"See. pictures below

5.3 Click on the "Add" button, enter the corresponding public IP address in the modal window that opensSee. pictures below

5.3.1 Click "Save"
After setting up "Address Matching", when creating DNS domains, internal IP addresses will be translated to external IP addresses.
If you install on a KVM server, then you don't need to forward ports, you also don't need the "Third and fifth points", you just do the same thing, but without writing to support and adding IP."
6 Domain Proxying
Further actions are needed only for NAT servers.
In order for your site to open without specifying the port in the address bar, it is necessary to inform our proxy server that your domain belongs to your virtual machine. First, send the necessary A-record to the public IP address specified in the order description. Next, contact the support service, name your order number and domain (or subdomain) which needs to be proxied. We can also provide a technical subdomain if you don't have a domain and need a website with it.
7 https access to the site
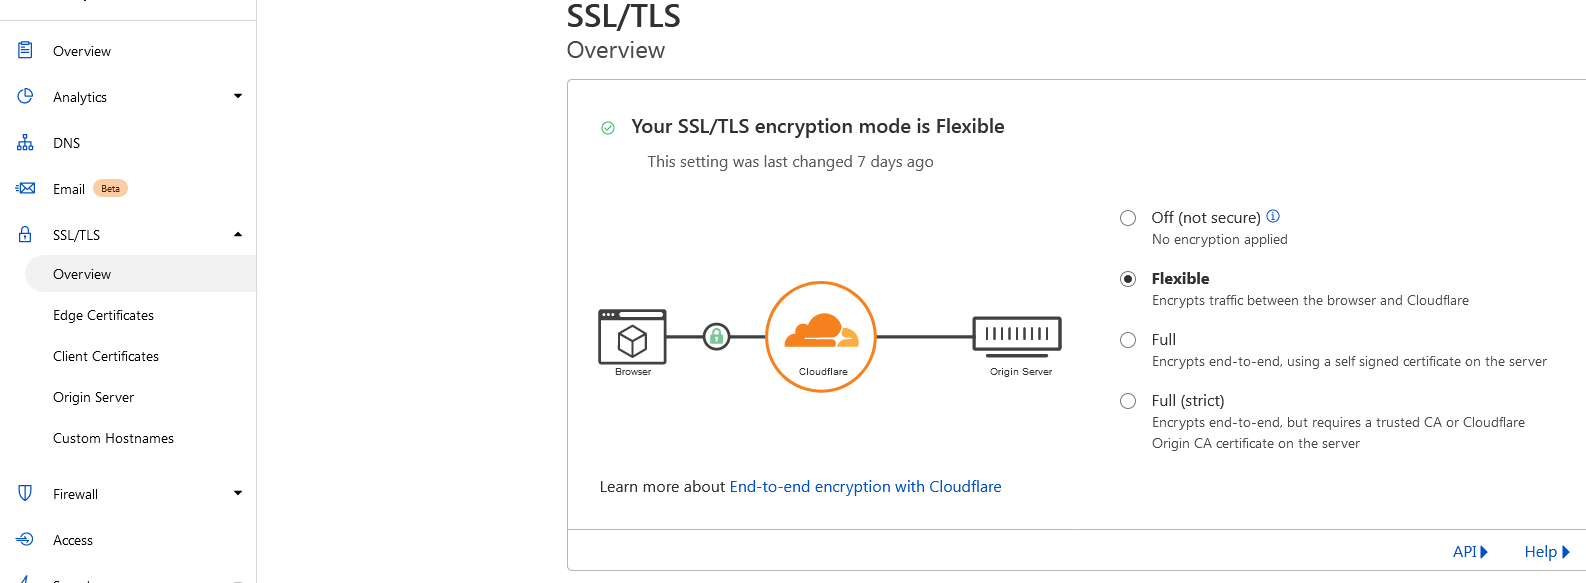
In the article "Measure seven times, cut once" we have already talked about the features of NAT and that an https connection can only be established through services like CloudFlare. You need to add your domain under the management of this service (the service has a free tariff).
When the domain is added to the service (requires up to 72 hours of waiting time), you need to go to the menu of your domain, select "SSL/TLS" on the left and set the value "Flexible"
Open ports - 3306, 8888, 7777
FASTPANEL license
apt-get update && apt-get upgrade
CentOS
yum update && yum upgrade
Login: fastuser
Password: lNd+eg3wyLsI2+0n
https://cp.fastpanel.direct/. Then we go through registration and click "Order a new license", after which you need to "Add the license to the cart and fill in the IP address field" and click "Proceed to payment", after that the license will be automatically created." The license is free.See picture below
In order for your site to open without specifying the port in the address bar, it is necessary to inform our proxy server that your domain belongs to your virtual machine. First, send the necessary A-record to the public IP address specified in the order description. Next, contact the support service, name your order number and domain (or subdomain) which needs to be proxied. We can also provide a technical subdomain if you don't have a domain and need a website with it.
When the domain is added to the service (requires up to 72 hours of waiting time), you need to go to the menu of your domain, select "SSL/TLS" on the left and set the value "Flexible"
© 2019-2023 Hostetski, Identification number 302259623, Tbilisi, Georgia. All rights reserved.
We've been working for 4 years 8 months 19 days

We've been working for 4 years 8 months 19 days